Installing a new roof is a substantial home improvement project that may take days or weeks to complete. The duration depends on several factors.
A well-executed roof installation shields your home from harsh weather conditions and lowers energy bills. It also prevents moisture damage and structural issues. Contact Roof Installation Massachusetts for professional help.
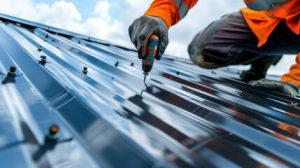
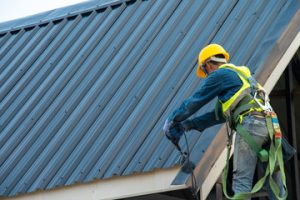
To start, roofers remove the existing roofing materials and inspect the roof deck. They then install underlayment to act as a barrier against water and ice. They also install flashing around chimneys and vents.
Preparatory Work
When you hire professional roofers for your home’s roof installation, they will perform a variety of preparatory tasks to ensure that the new roofing materials are installed properly. This is done to prevent leaks, water intrusion, mold and other problems that can damage the integrity of the structure.
A top-tier roofer will prepare the work area by removing old shingles, underlayment and flashing. This process exposes the bare roof deck and allows our local roofers to inspect the condition of the deck and make any necessary repairs. It also helps to detect any hidden damage or rot that may be present.
After the deck is inspected, our roofers will install underlayment. This is a waterproof barrier that protects the roof from moisture infiltration. It is typically made of felt or synthetic material. Our roofers will then install ridge vents and soffit vents to promote proper airflow and to help keep your home cool and comfortable. They will also clean and seal gutters to prevent debris from entering your roof or overflowing the gutters and causing water backup and damage to the deck of the roof.
Finally, they will install flashing. This is a metal material that is installed around chimneys, vents and other protrusions on the roof to keep water from sneaking in at those vulnerable spots. Our local roofers will pay close attention to the edge details, ensuring that all seams are tightly sealed and watertight.
In addition, our professionals will prepare the roof for shingles or panels by cutting a slot along the ridge and installing ridge vents. They will also install soffit vents to promote airflow and to keep your home cool and dry.
While you can do some of the preparatory work yourself, it is best to leave this job to professional roofers. They have the training, expertise and tools to do it safely and quickly. In addition, they know the building codes and regulations in your area and will ensure that your roof is built to withstand harsh weather conditions. They will also be sure to follow all local and federal laws regarding asbestos, hazardous waste and other environmental concerns.
Materials
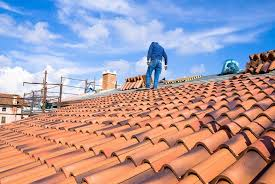
A quality roofing system requires a number of materials to provide protection and durability. The right choice will depend on a homeowner’s budget, style preferences and climate. Durable options like slate, concrete and clay tiles offer longer lifespans than asphalt shingles but may require higher upfront costs or structural reinforcement.
Sheet sheathing, such as plywood or oriented strand board (OSB), provides a stable base for a roof and serves to seal the deck against moisture damage. It also protects the underlying structure from the elements. Water-resistant underlayment is placed over the sheathing and helps prevent leaks at areas like eaves, valleys and dormers. Flashing is then installed to prevent water from entering at these points.
Tile roofs, such as slate, concrete or clay, are popular options for premium roofing. They are durable in extreme weather and come in a variety of shapes, sizes and colors. They are expensive, however, and can put a significant strain on the existing roof structure.
Wood shingle roofs, such as cedar shake or composite shingles, are also durable options. They can be more affordable than natural slate or clay, and they are versatile enough for many styles of homes. They can be a poor fit for certain climates due to their high water absorption rate and are fragile in very cold temperatures.
Other roofing materials include metal roofs, single-ply membranes and shingle-over-metal systems. These roofs are ideal for commercial buildings and flat or low-sloped residential roofing. Metal roofs are extremely durable and rust-resistant, but they can be noisy and difficult to install. Single-ply membranes are highly durable, watertight and resistant to punctures and chemicals. They are usually made from EPDM or TPO, and they have reflective surfaces to help reduce cooling costs.
A shingle-over-metal system is similar to single-ply membranes but with the added benefit of insulation for additional energy efficiency. It is ideal for metal roofs, tin roofs and some asphalt shingle roofs. It is best suited for warm weather and may be damaged by extreme cold temperatures or hail storms.
Installation
A well-executed roof installation provides a barrier against the elements, protecting your home from rain, snow, wind, and extreme temperatures. It also helps to improve your energy efficiency, reducing your heating and cooling costs. However, a poorly installed roof can cause water intrusion, moisture damage, and structural failures.
An expert roofing team can help you choose the best roofing material for your needs, architecture, and budget. They can also recommend different roofing systems that meet your building codes and regulations.
During the roof installation, professionals place underlayment to prevent moisture from seeping into the roof deck and wood structures. They then install the new shingles or roofing materials, starting with the starter row at the eave and then laying each main shingle in a staggered pattern, following the manufacturer’s instructions for spacing and alignment. They also install flashing around chimneys, vents, dormers, TV satellite dishes, and other protruding features to help prevent leaks.
When they’re finished, the roofers will remove any old shingles or panels and dispose of them safely. They’ll then sweep and clean up the work area, making sure there are no lingering nails or debris on the lawn or driveway. Finally, they’ll perform a leak test and complete the inspection.
Final Inspection
A professional roofing company should conduct a final inspection to ensure that the installation is complete and meets quality standards. They should also clean the work area and remove any debris. This helps to prevent any problems in the future and protects the homeowner’s investment.
The final inspection is a pivotal step in the building process and must be completed before a building can receive a certificate of completion or occupancy. It is a quality assurance check that ensures the finished product meets customer expectations, safety standards, and legal requirements. Conducting a final inspection minimizes disputes and complaints, enhances customer satisfaction, and improves operational efficiency.
Structural Integrity: The inspector will assess the building’s frame, walls, and ceilings for any signs of structural weakness or instability. They will also evaluate the insulation, windows and doors, HVAC systems, and fire prevention systems. In addition, they will inspect the plumbing piping, drains, and fixtures for compliance with local codes and regulations.
Electrical Systems: The inspector will review the wiring, electrical panels, and lighting fixtures for compliance with safety regulations. They will look for issues like exposed wiring and defective lighting that may pose a threat to the safety of residents.
Quality Validation: The inspection will confirm that all construction work is in substantial compliance with the approved construction documents and this code. This can help avoid legal trouble and costly repairs in the future. Resale Value: A home with a record of successful inspections will be more attractive to potential buyers, as they will know that the property has been well-maintained and is safe for living.
Whether you are constructing a new residential or commercial building, or conducting renovations, a thorough final inspection is essential to protecting your investment. A qualified and experienced home and commercial building inspector can ensure that your project is completed to the highest standard and in compliance with local codes and regulations.